PPE - Prepayment in Sales and Purchase
Prepayments are subject to VAT and must be specifically posted in the general ledger and VAT entries.
This guide describes the procedures for creating and posting prepayment and final invoices, as well as prepayment credit memos. The process for creation and posting is the same in sales and purchase.
Functionality includes
-
Posting of prepayment payment
-
Creation and posting of prepayment invoice
-
Creation and posting of a final invoice linked to the prepayment
-
Creation and posting of a prepayment credit memo
Prepayment Setup
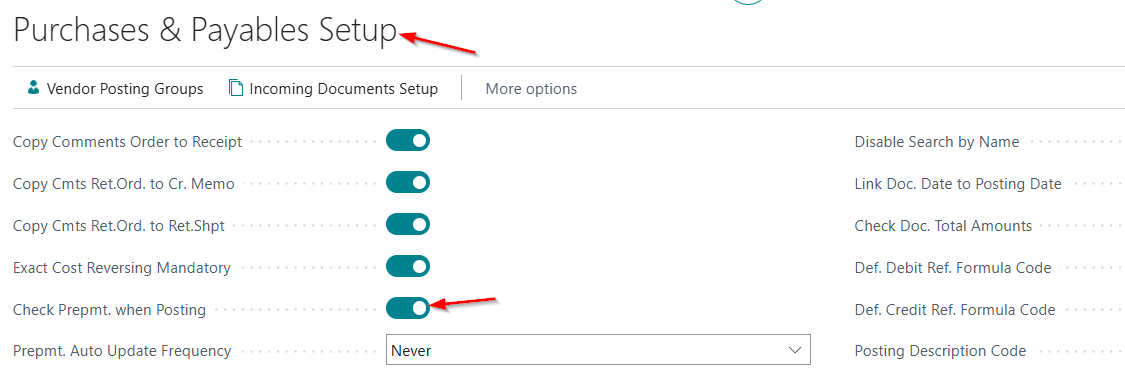
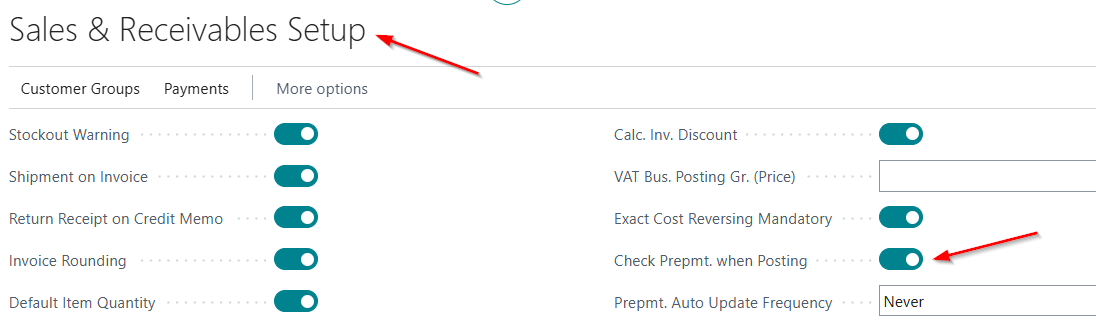
On the Sales & Receivables Setup and Purchases & Payables Setup pages, you must enable the Check Prepayment option during posting.
Check Prepayment during Posting – This option allows the system to verify, before posting, whether the prepayment defined on the document lines has been paid and linked to the document. If the prepayment has not been recorded, posting of the document will not be allowed.
In Search, enter Sales & Receivables Setup and select the option above, then repeat the same procedure on the Purchases & Payables Setup page.
Prepayment Posting Groups for Sales and Purchasing
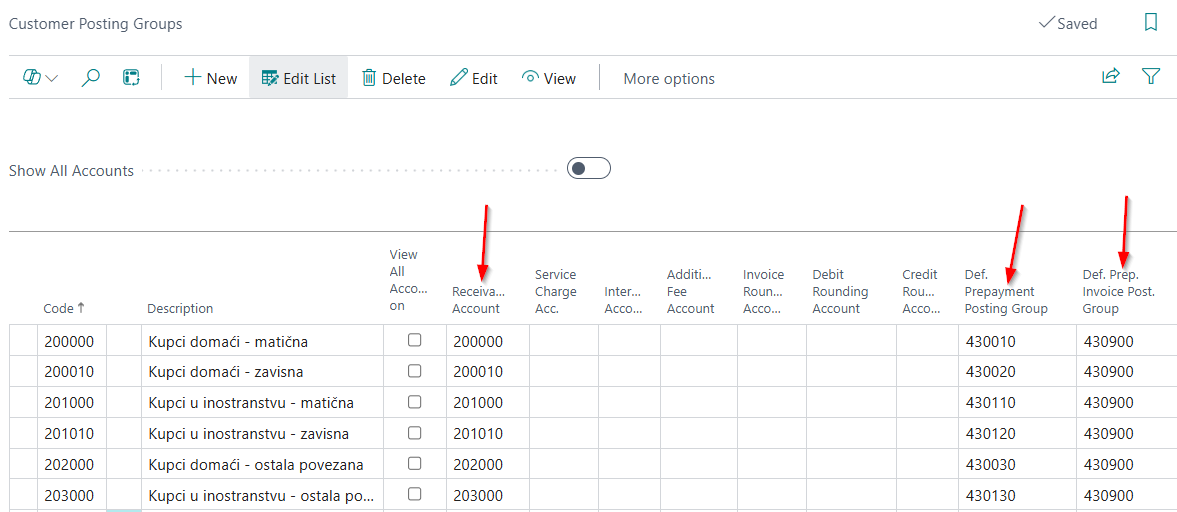
In the search field, enter Customer Posting Groups, and then on the opened page specify the Default Prepayment Posting Group and Default Prepayment Invoice Posting Group.
For receivables accounts 200, 201, 202, 203, 204, and 205, as well as for any other receivables accounts for which you want to use prepayments, enter the corresponding accounts for prepayments and prepayment invoices.
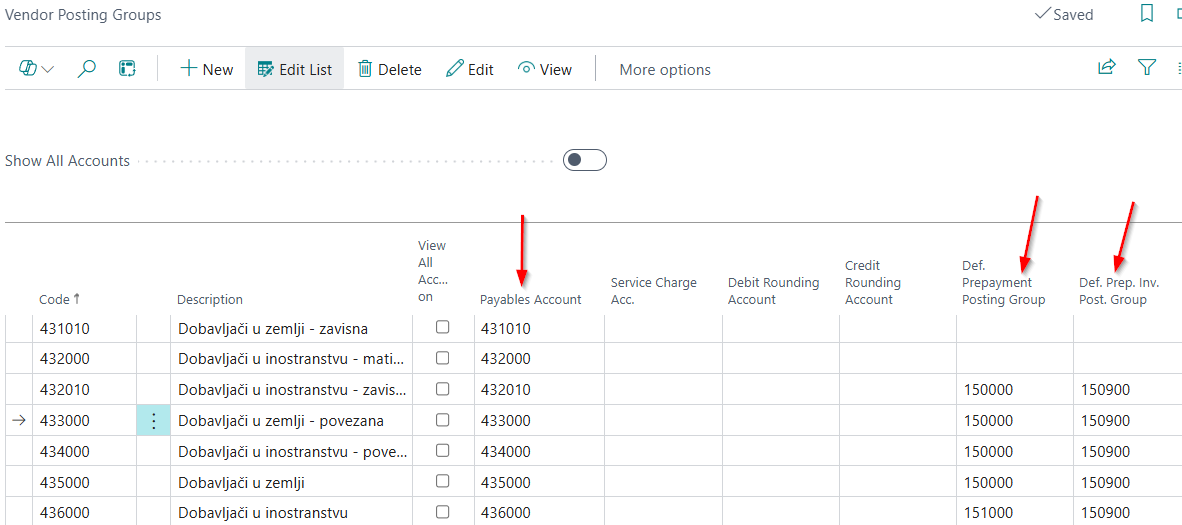
Repeat the same procedure for vendors: in the search field, enter Vendor Posting Groups, and then on the opened page specify the Default Prepayment Posting Group and Default Prepayment Invoice Posting Group.
For payables accounts 431, 432, 433, 434, 435, 436, as well as for any other payables accounts for which you want to use prepayments, enter the corresponding accounts for prepayments and prepayment invoices.
VAT Posting Setup – Prepayments in Sales and Purchasing
In the search field, enter VAT Posting Setup. The following setup window will open:
• VAT Business Posting Group: Defines whether the transaction relates to a customer or a vendor.
• VAT Product Posting Group: A separate posting group is created for prepayments (A20).
• VAT Identifier: A code that tells the system which VAT rule to apply during posting.
• VAT %: Enter 0.
• VAT Calculation Type: Specifies how VAT will be calculated for purchases or sales. For prepayments, select VAT Only.
• Sales VAT Account: Specifies the general ledger account to which Sales VAT is posted for a specific combination of VAT Business Posting Group and VAT Product Posting Group.
• Purchase VAT Account: Specifies the general ledger account to which Purchase VAT is posted for a specific combination of VAT Business Posting Group and VAT Product Posting Group.
• Purchase VAT Product Posting Group – reverse for prepayments: Specifies the posting group for the purchase prepayment VAT amount. This field is mandatory because the VAT entry posting group is changed when the final invoice is created.
• Sales VAT Product Posting Group – reverse for prepayments: Specifies the posting group for the sales prepayment VAT amount. This field is mandatory because the VAT entry posting group is changed when the final invoice is created.
• VAT % (retrograde): Enter 20.

VAT Business Posting Group + VAT Product Posting Group = VAT rate and posting setup.
Posting of Prepayment
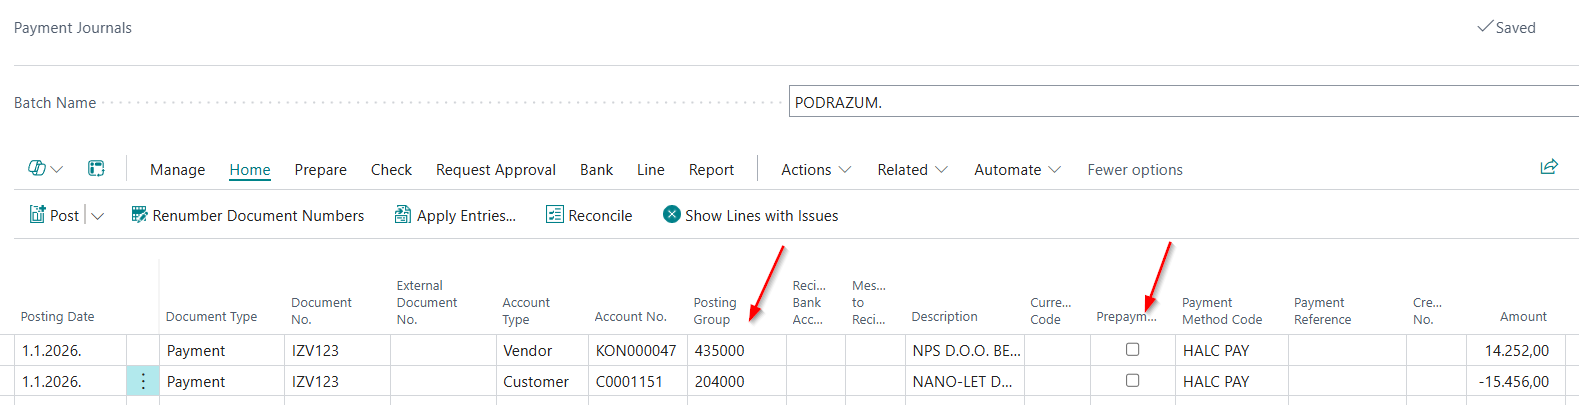
Payments are recorded through the Payment Journal and Bank Accounts page. You need to select the bank account where the payment is recorded, or open a Payment Journal or a Payment Reconciliation Journal, depending on the payment process being used.
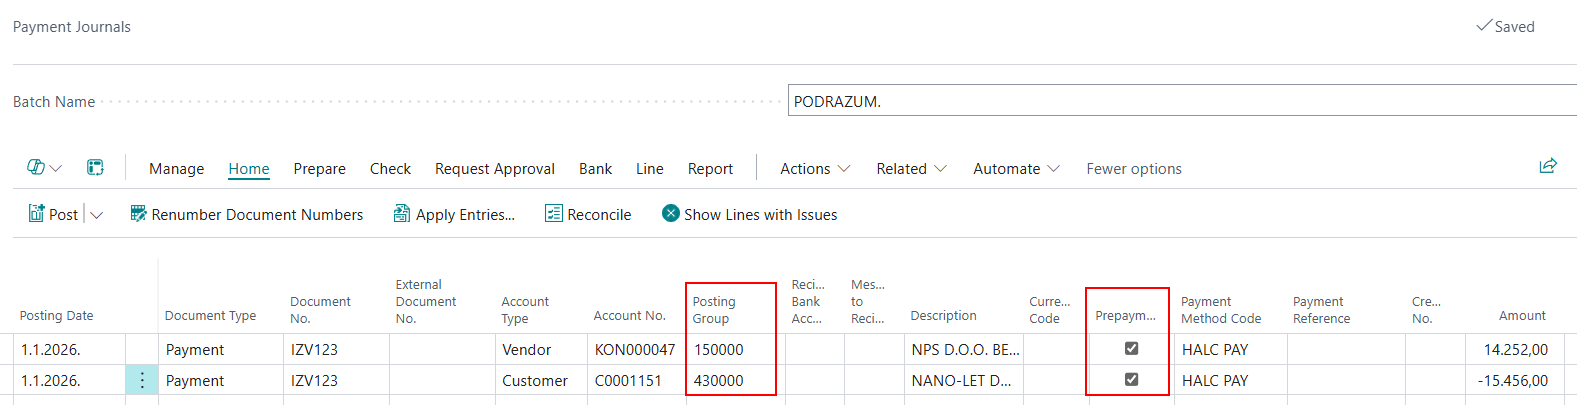
In all of the above journals, the process is always the same. On the customer or vendor payment line, it is necessary to mark the Prepayment field. By selecting this field, the system applies the prepayment posting group defined in the Customer Posting Groups or Vendor Posting Groups setup.
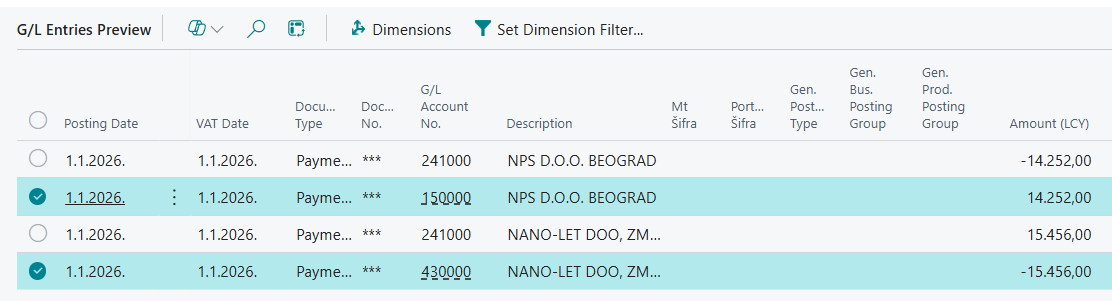
The journal is ready for posting. In the posting preview, under General Ledger Entries, it can be seen that the prepayment lines are posted to the prepayment accounts.
Creation and Posting of Prepayment Invoice
The process of creating a prepayment invoice is identical for both sales and purchasing. Our example is a sales invoice. The header of the sales invoice is filled in in the usual way:
-
On the General tab, the customer is entered.
-
The appropriate posting date is entered.
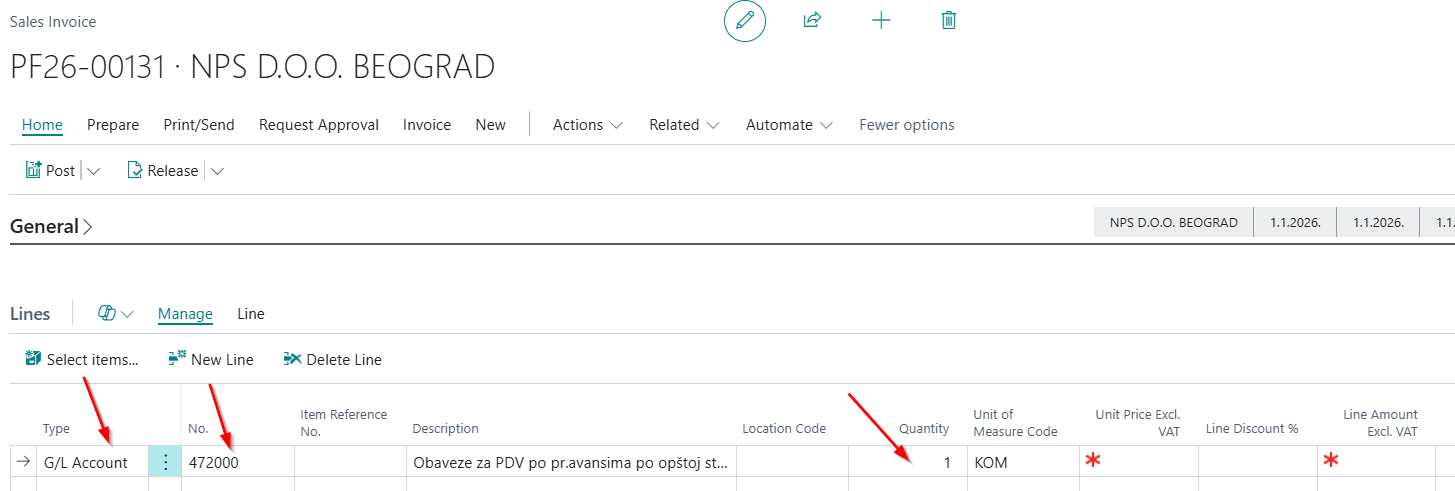
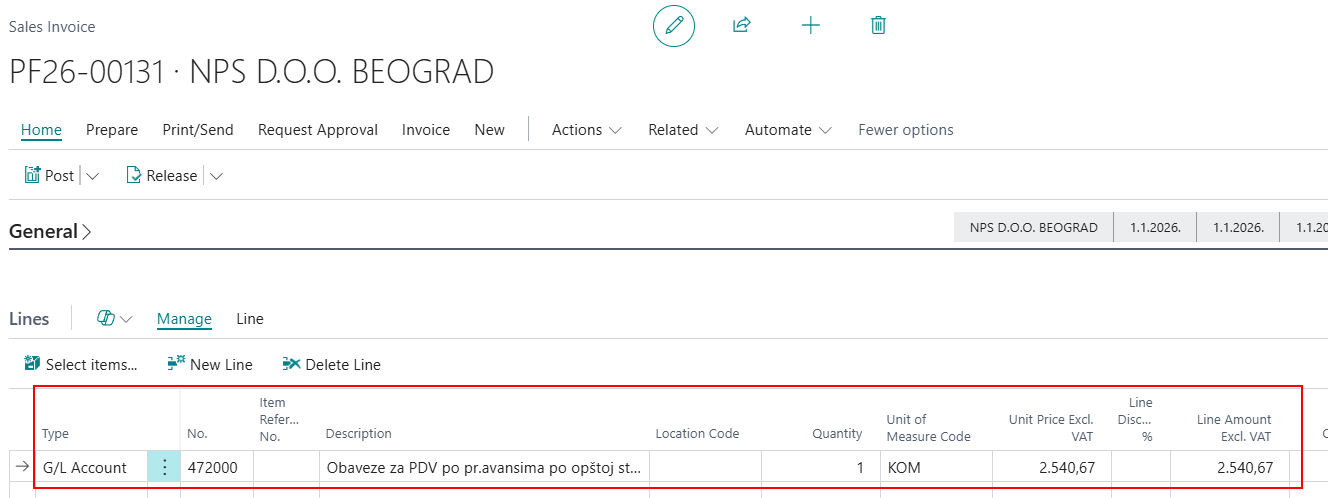
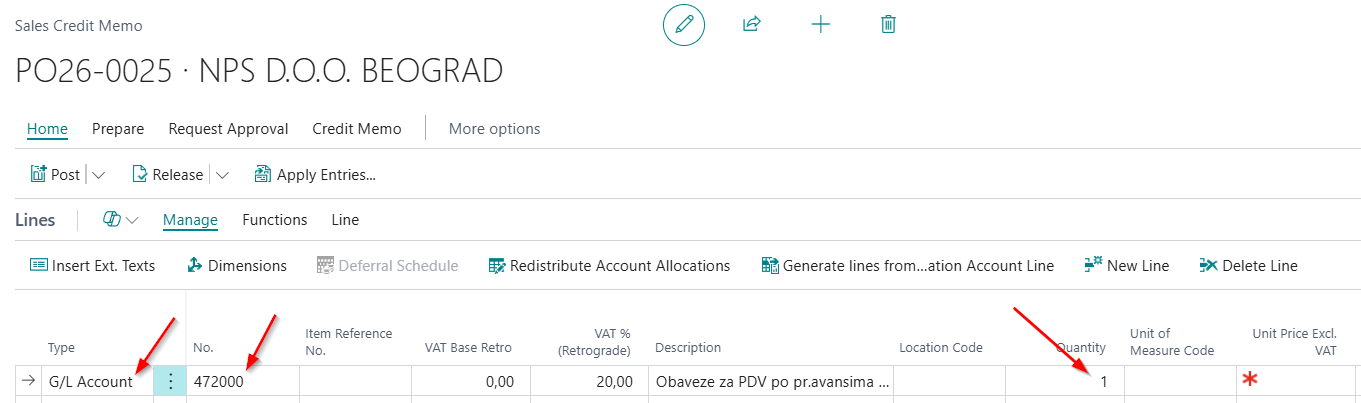
On the sales invoice lines, the following fields must be filled in:
-
Type: G/L Account
-
Account No.: 472 – VAT on received prepayments at the standard rate
-
Description: filled in automatically
-
Quantity: 1
The Unit Price Excluding VAT field is not entered manually. The system will automatically populate the value after selecting the appropriate prepayment. The prepayment is selected on the Invoice Details tab. It is necessary to mark the Prepayment field, and then in the Prepayment Entry No. field, select the corresponding prepayment from the drop-down list (by clicking the arrow).
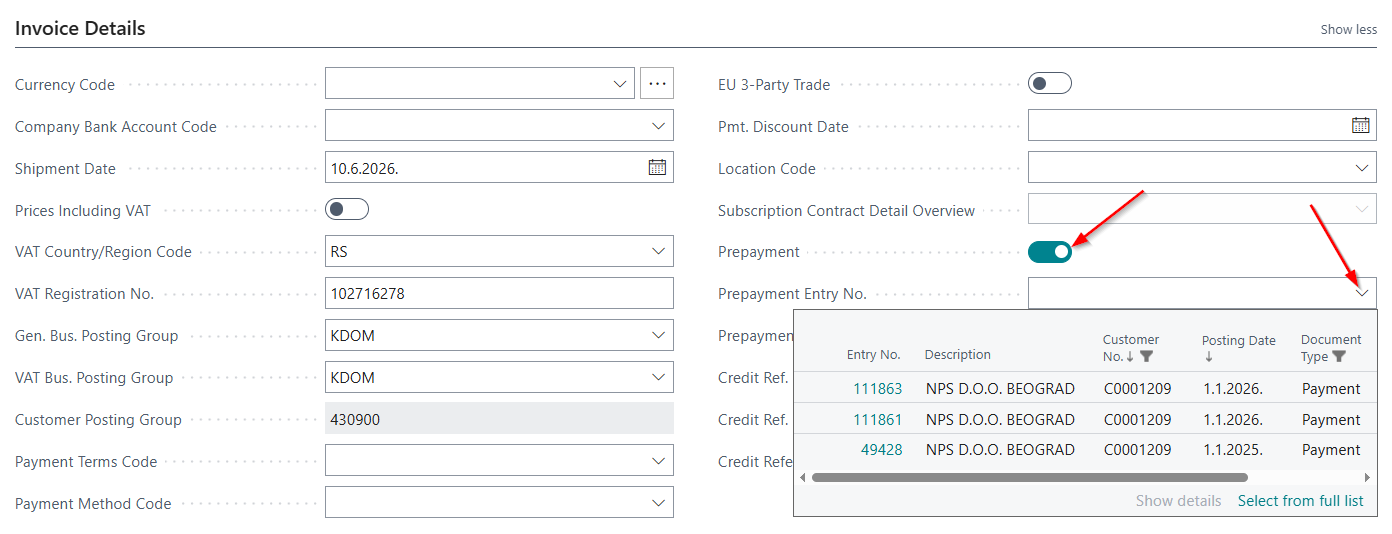
After selecting the prepayment, the system automatically enters the VAT amount on the document line, and the Unit Price excluding VAT field is filled in automatically. In this way, the document is fully completed.
The document is ready for posting. In the posting preview, under General Ledger Entries, you can see the prepayment invoice entries related to the VAT amount.
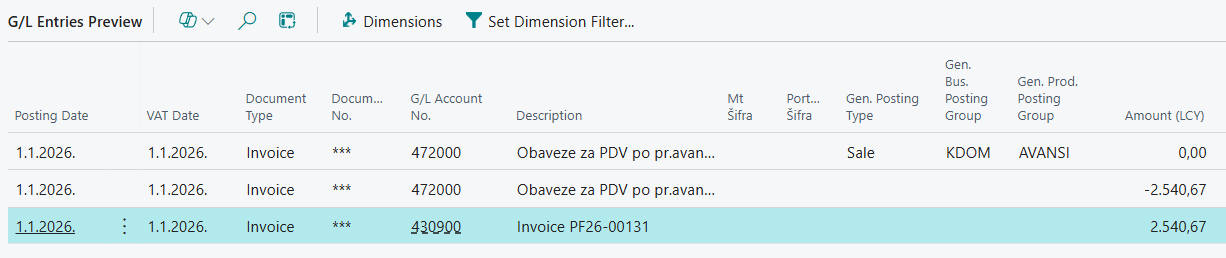
In the posting preview, under VAT Entries, it can be seen that only the VAT amount is recognized, while the base amount is not recorded.

Creation and Posting of the Final Invoice Linked to a Prepayment
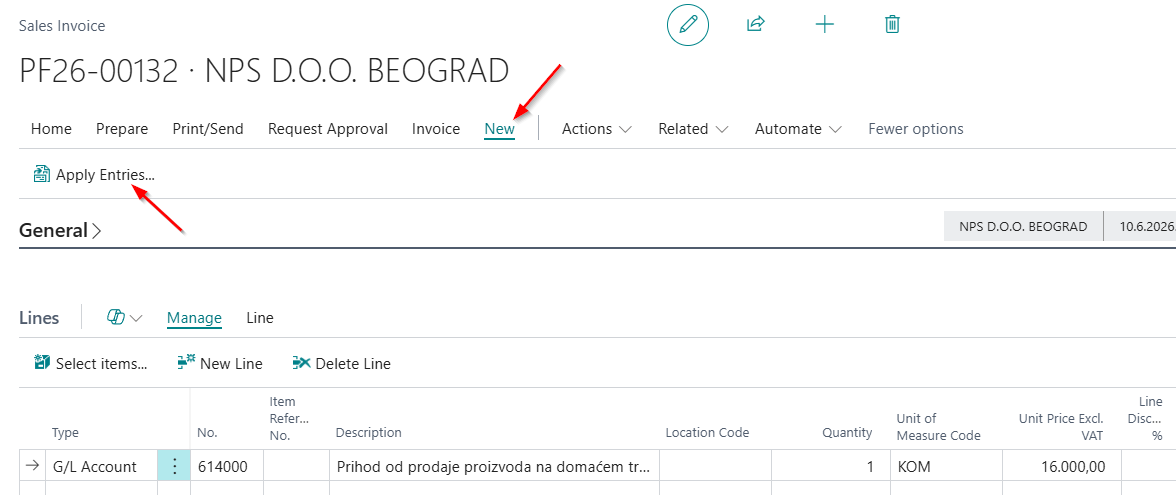
A sales or purchase invoice is created for goods or services in the usual way by filling in the header and document lines. After that, the prepayment is linked to the final invoice using the Apply Entries option.
On the New action, it is necessary to run the Apply Entries function. On the page,
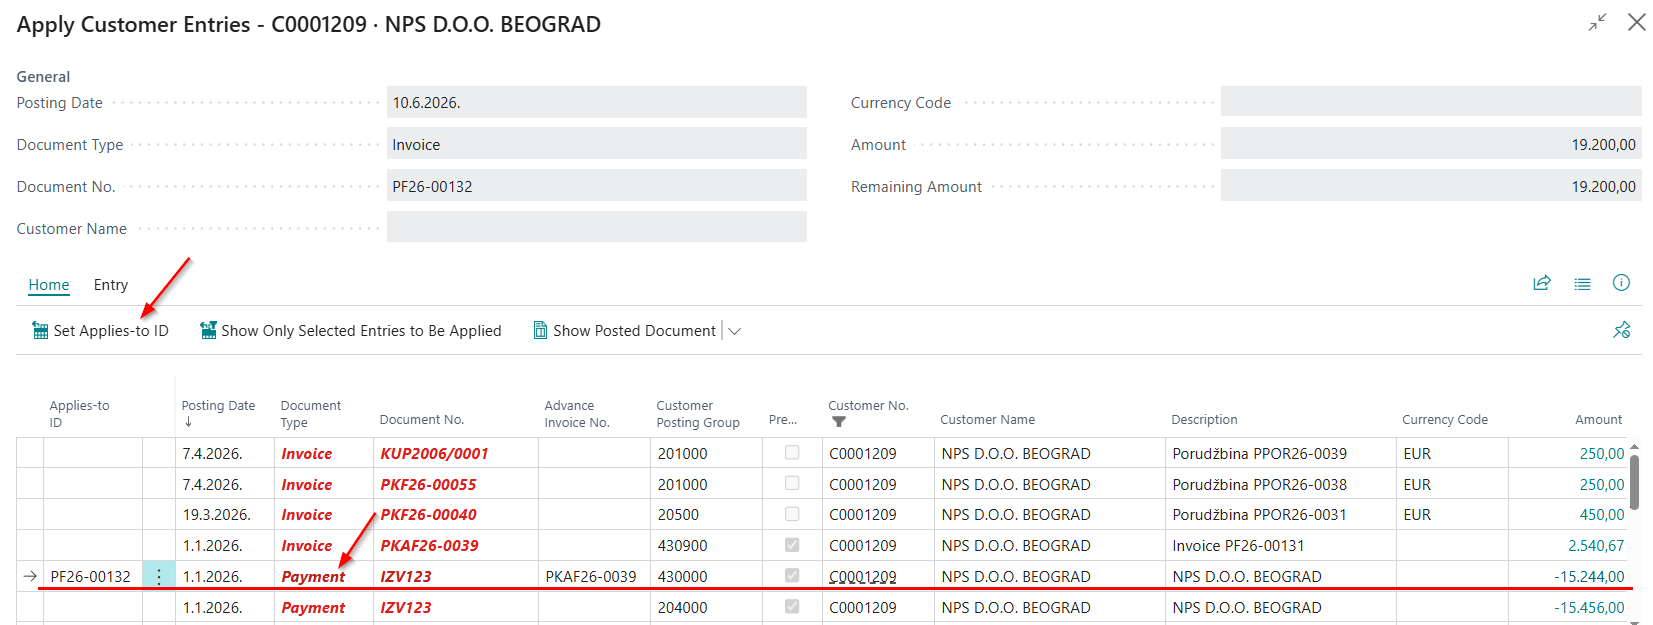
After that, the invoice is posted in the usual way. During posting, the prepayment and prepayment invoice entries are automatically applied and closed.
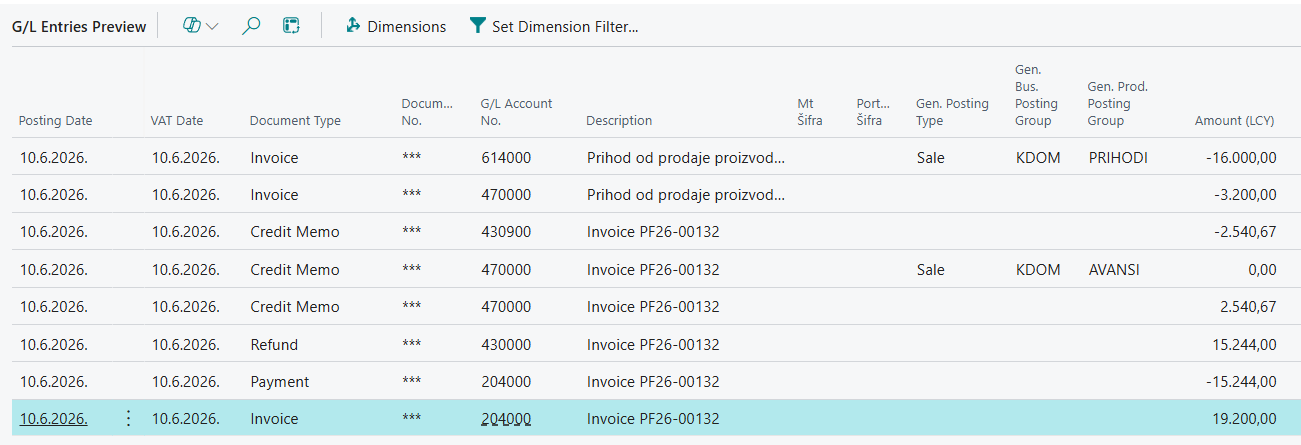
In the posting preview, under General Ledger Entries, it can be seen that this posting simultaneously records the final invoice, reverses the prepayment invoice (credit memo), and processes the refund of the prepayment while reclassifying it as a regular customer payment.
Credit Memo for a Final Invoice Linked to a Prepayment
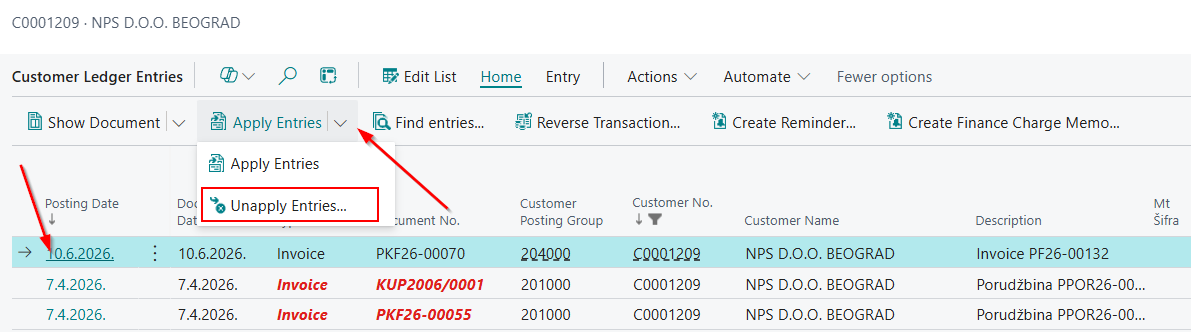
The first step before creating a credit memo for a final invoice that is linked to a prepayment is to unapply the applied entries by using the Unapply Entries function. In the Vendor Ledger Entries, select the final invoice to be unapplied, and then run the Unapply Entries action.
Note: The Unapply Entries of a final invoice linked to a prepayment must always be initiated from the final invoice. Therefore, it is necessary to select the final invoice entry and then run the Unapply Entries function.
Once the entries have been unapplied, you can use the standard function to create a credit memo.
Creation and Posting of a Prepayment Credit Memo
If a prepayment invoice has been posted incorrectly, it is necessary to create and post a prepayment credit memo. For this purpose, the standard Sales Credit Memo or Purchase Credit Memo documents are used, with certain process-specific requirements.
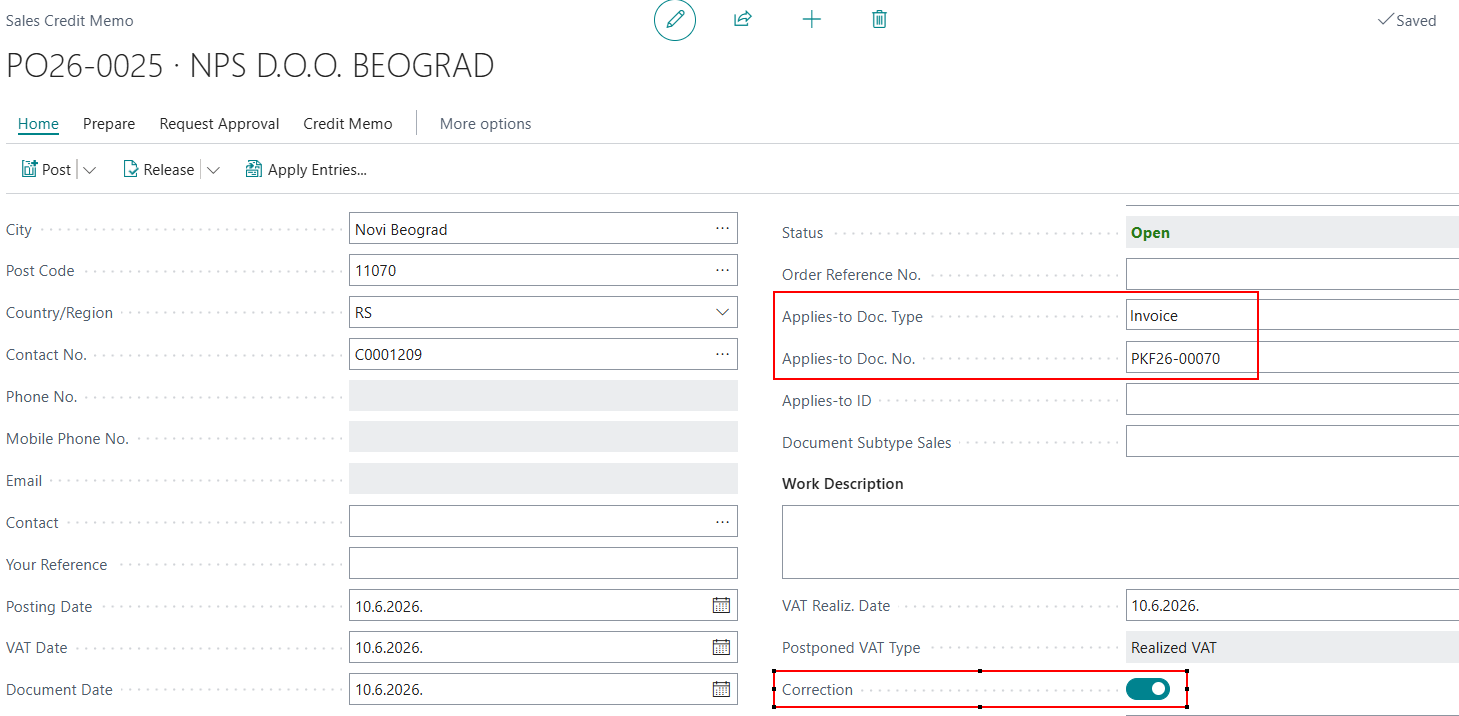
When creating a credit memo, on the General tab, in addition to the mandatory standard fields such as customer or vendor and posting date, it is also necessary to fill in the following fields:
-
Applies-to Doc. Type – Select Invoice.
-
Applies-to Doc. No. – Select the number of the prepayment invoice to be reversed.
-
Select the Correction check box.
On the document line, enter the following information:
-
Type – Select G/L Account.
-
No. – Select the appropriate VAT account.
-
Quantity – Enter 1.
-
The Unit Price Excl. VAT field is not entered manually.
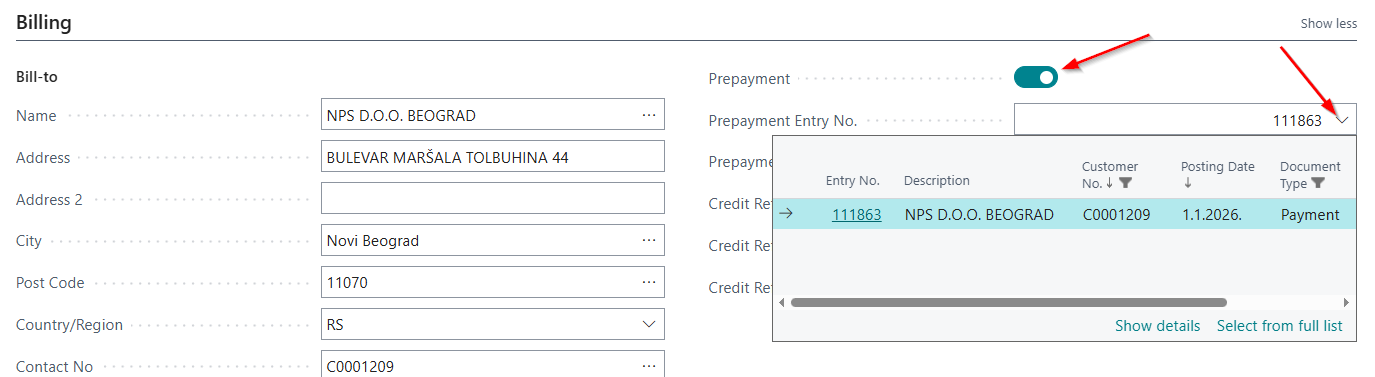
On the Billing tab, it is necessary to:
- Select the Prepayment check box.
- In the Prepayment Entry No. field, select the appropriate prepayment. Clicking the drop-down arrow opens a list of available prepayments.
After the prepayment is selected, the system automatically transfers the corresponding amount to the credit memo line and populates the Unit Price Excl. VAT field.
The next step is posting the credit memo.
In the posting preview, under General Ledger Entries, you can see the entries that will be created to reverse the entries generated by the posting of the prepayment invoice. Additionally, under VAT Entries, you can see the VAT entries that will be created to reverse the VAT entries recorded during the posting of the prepayment invoice.


Need more help?